Pages

Monday, February 27, 2012

Trading Art For Art~

It's so enjoyable receiving letters and packages in the mail that contain little treasures and sweet messages. Tags and art pieces have been sent to me as gifts and I have sent gifts of tags and art pieces to blogging friends. However trading an ATC's or trading art for art with someone is new to me. On Valentine's Day I posted an ATC background to share with everyone. I also posted a photo of my finished ATC that I wanted to trade. I only made one Valentine ATC to trade but I ended up trading with three friends.  We traded ATC's and tags. It has been a lot of fun.

This beautiful ATC is from Daniella Hayes
 I love all the details. Some are hard to see on the photo. The white paper behind the flower has a faint postmark in the corner. 

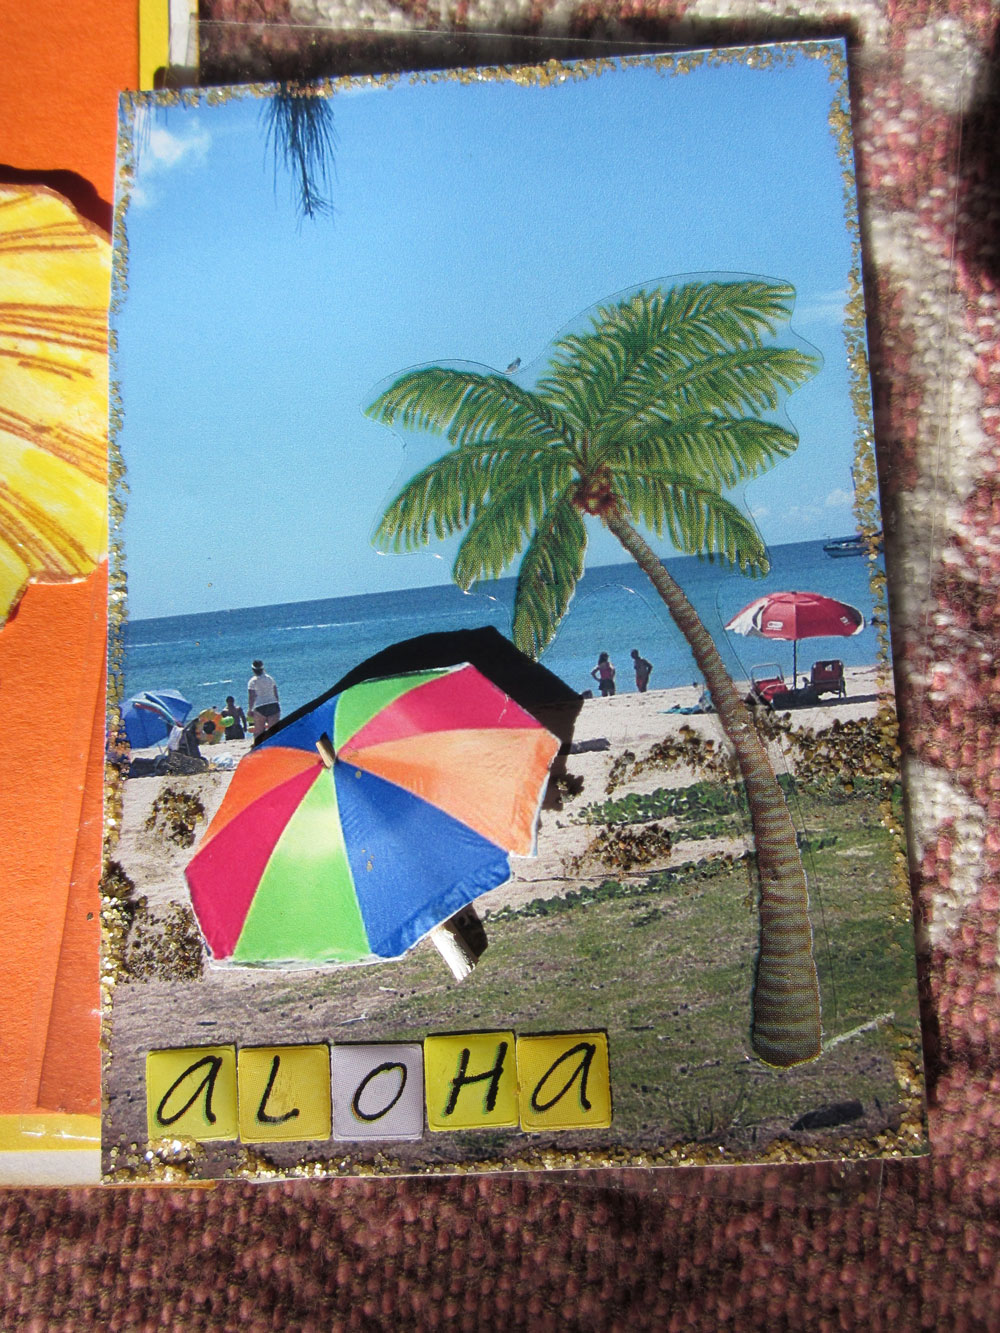
This lovely card with the flower and butterfly is from Marti at Marti's Musings.  I mentioned to Marti how much I like the beach but seldom get to visit one. She sent me on a Hawaiian beach vacation. Her ATC background is an actual photo from one of her family vacations. I love her addition of the palm tree and the sun umbrella. 


This adorable fairy is from JoAnne at Vintage Dragonfly. I wanted to include it again in this post since JoAnne was the first person to trade with me. 
Little pieces of sunshine to brighten my day...
Thank you all! 

Linking to:
http://ahappyvalentine.blogspot.com/
http://knickoftimeinteriors.blogspot.com/
http://fadedcharmcottage.blogspot.com/
http://madeinaday.com

Thursday, February 23, 2012

Friends are...

My friends Marcia and Jenny are celebrating with a two for one celebration of friends link party. It's Jenny's birthday and Marcia's blogging anniversary. They are having a link party and a give away. Click here to visit our hostess Marcia at In Stillness and Simplicity.

" Our friends are like angels, 
Who brighten our days.
In all kinds of wonderful ways.
Their thoughtfulness comes,
As a gift from above.
And we feel we're surrounded, 
By warm, caring love.
Like upside-down rainbows,
Their smiles bring the sun.
And they fill ho-hum moments,
With laughter and fun.
Friends are like angels,
Without any wings.
Blessing our lives,
With the most precious things."
(Author unknown)

Donna my friend from My Shabby Chateau shared a tutorial on how to up-cycle an inexpensive candle. I thought it was a great project idea and I wanted to give a thank you gift to my friend Kim (a non-blogger). Click here if you would like to find the project tutorial and visit Donna.
Some of you may recall that I made an ATC Valentine and offered to trade it with someone. The first person to respond was my friend JoAnne from Vintage Dragonfly. It was the first time I traded an ATC. I am thrilled with the beautiful art pieces I received in the trade with JoAnne. I encourage you to visit her awesome blog, click here.
 Isn't this the sweetest little fairy ATC ever?
I had a few other friends offered to trade with me as well. We decided on trading art for art. The trade could be a tag or an ATC.  Besides being fun it's a good way to get to know one another a little better. 

I'm linking this to:
http://thebrambleberrycottage.blogspot.com/
http://howsweetthesound.typepad.com/my_weblog/
http://knickoftimeinteriors.blogspot.com/
http://twenty-eight-0-five.blogspot.com/

Friday, February 17, 2012

Polished Needle Cases ~ Valentine Matches?

What can you do with some pink and purple nail polish and a few nail art pens? Well you could paint your finger nails or...
you could paint a couple of wood needle cases.

Add some tiny beads and rub the edges with StazOn ink .


I found these strikingly odd ((smiling)) Valentine's last week while gathering vintage Valentine images. I decorated some small match boxes for my adult friends. 
Please click on the links below to visit some fun blog parties and say hello to our lovely hostesses. Have a funtastic week!

Linking to:
Enhanced by Zemanta

Sunday, February 12, 2012

A Valentine's Gift For You!

From me to you.


The little heart stitching angel (from Google free clip-art images) was combined with four images from Dezinaworld (the background, the upper left corner lace design, the button, and the spool of thread under the chair) and I added one other graphic (the chair) from the Graphics Fairy. With the assistance of my Photoshop Elements software I merged and blended them together and added a text message to create an image for my ATC Valentine. I reduced the image to 2 1/2"  by 3 1/2", printed it out and glued it to a decorative piece of card stock of the same size. I added two real buttons trimmed in ribbon and lace next to the button image. I outlined the edge of the heart in red glitter and finished it with a gold glitter frame. You may print out my ATC image and decorate it as you wish for you own ATC to keep or give. To do that just right click on the image and save it to your computer.
I would love to trade my ATC with one of you for one of your ATC creations. It doesn't have to be from my image or even a Valentine design. I will trade with the first person to e-mail me telling me you want to exchange ATC's. 
My next gift came from post comments and email requests asking, "How did you make that"? A few people noticed my lace envelope in a previous post. I made the envelope for a Valentine that I sent to a special friend. I won't be able to make all of you an envelope but I can show and tell how I did it. My second gift is an easy tutorial on how to make a paper doily envelope. 


Paper Doily Envelope Tutorial

Supplies:
10" by 10" paper doilies (a standard 4 1/4" by  5 1/2 " card fits inside nicely)
Scissors
Bone Folder (optional)
Glue
Position the doily in a diamond with the wrong side facing you. 
 The center of the doily will become the front of your envelope. Fold the left and right side triangle sections towards the center. Gently crease the edges with a bone folder or your finger tip. Take care not to tear the doily. 
Fold the top and bottom triangles toward the center.
 Unfold the flaps and trim the corners where the triangles overlap.
 Apply glue to a few areas in the right triangle. Place a small sheet of wax paper inside the flaps to keep the glue from sealing the envelope closed.

Fold the right and left sides together.
Apply glue to the bottom flap, fold up, allow to dry. Check inside to make sure glue isn't sticking to the opposite side. 

Insert your card and use a pretty sticker to seal. 
This doily envelope is very delicate and should be hand delivered or sent in an sturdy mailing envelope.  There is a technique using freezer paper to make the doily sturdier for regular mail delivery. 


Paper Doily Envelope With Freezer Wrap Tutorial. 
Supplies:
10" by 10" paper doilies (a standard 4 1/4" by  5 1/2 " card fits inside nicely)
Scissors
Bone Folder (optional)
Glue
 Cut a 9 1/4" by 9 1/4 " sheet of freezer paper. Place the shiny plastic coated side of the freezer paper to the wrong side of the doily.
 Use a hot dry iron setting to melt the freezer paper (plastic coated sided down) to the doily. To protect your iron you may want to use another sheet of plain paper or fabric between the iron and the freezer paper. 
 The photo above shows the doilies with and without freezer paper. 
 Fold, trim, and glue the triangles as suggested in the tutorial without the  freezer paper. 
 As you can see the freezer paper isn't as delicate looking but it is more durable. 
If you plan to send it you may want to tack down all the scalloped edges to prevent it being torn in the postal machines.  

Happy Valentine's Day!
I'm linking to:

Thursday, February 9, 2012

It's Better To Give...And So Much Fun To Receive~Valentines

Gifts~received…
I received a package the other day from my 6-year-old granddaughter, Mary Jane. She and her mother (my oldest daughter) were treasure picking through a jar of vintage buttons that a relocating neighbor gifted my daughter. They knew I would love to have some of the buttons and they had also found an old, bent, rusty key and saved it for me. I just love these kids.
My little granddaughter is a budding artist and an excellent colorist. IS that a word? She loves to color. She wrote this sweet letter decorated with colorful stencils. Please note her free-hand drawing of a button and a key. She knows all about my Pink Saturday posting so she made sure to put several pink buttons in the bag. Her letter is the best gift and touches my soul.
It’s awesome to receive!


I also received a card from my friend, Marcia at In Stillness and Simplicity. She sent me one of her beautiful lavender Valentine tags. You can see how lovely the tag looks but you can’t tell that the tag held a light scent of lavender fragrance and best of all Marcia included her special prayer wishes. Visit Marcia’s uplifting blog here.

It’s awesome to receive!


Gift~giving…
One of my Valentine gifts to my granddaughter is a heart decoration we will work on together. I used a tablet backing, a doily, and card stock to fashion a sturdy large heart shape.  Then I glued the embroidery transfer pattern below in the center of the heart for her to color. I included a pink bow for her to glue at the top after she is finished adding her touches.  Voila! A Valentine decoration we created together. I’m hoping for a photo from her of our finished art project to post.  Kids love to get mail. I’m thinking there will be smiles from my granddaughter and my grandsons when the mail person delivers the Valentine cards and the package.

It’s awesome to give!


While I was writing this post my daughter called to say the Valentine's and my package had arrived. Mary Jane was so happy she immediately colored our project.  She exercised her artistic judgement and decided not to glue on the bow I had sent along. Here are some photos she emailed with our completed project. Isn't it beautiful? 

It's awesome to receive...


Gift~giving...
Here are a few more photos of gifts and Valentines I have made to give to some friends and family members.  The pleasure I receive in creating things and the joy I receive in giving things lifts my spirit.


It’s better to give…and it’s so much fun to receive…

Thank you to Beverly, Honey, Kim, Liz, and Cindy for hosting these fun parties.
I’m linking to:

Tuesday, February 7, 2012

At-tea-tude~Tea Cup Tuesday...

When I retired in December 2010 I received this cute Red Hat Lady figurine from a friend. The lady sitting in the cup has a unique style of creative fashion. Her attire along with her pose certainly express a relaxed, carefree, fun attitude. I think she is a perfect example of the women in the video Terri shared this week at Artful Affirmations. Click here to see the post called "What's So Special About Getting Old."


Last week my daughter emailed me some vintage images she had found online. I knew I had to share one special one with all the Tea Cup Tuesday fans. It is so cute. I printed out a few of the images in different sizes. I used smaller images to attach to tea bag envelopes for Valentine table favors and a larger one to make a Valentine card.  I wanted to share the finished card on this post but I ran out of time. It needs a few more finishing touches before it's ready to send it to a special friend. 


Go grab a cup of tea and have joyful day!


I'm linking to:
Tea Cup Tuesday
Knick Of Time Tuesday
A Woman Thing
White Wednesday